Why Won’t My Phone Charge (and How to Fix It in 10 Minutes)
By John Fix · FixItWhy Trust Score: 9.0/10
Your phone won’t charge and you’ve already swapped cables twice. Before you order a new battery or drive to a repair shop, give me ten minutes. Nine times out of ten, the culprit isn’t your battery, your cable, or your charger — it’s a dense little plug of pocket lint sitting at the bottom of your charging port, and you can pull it out for free with things you already have at home.
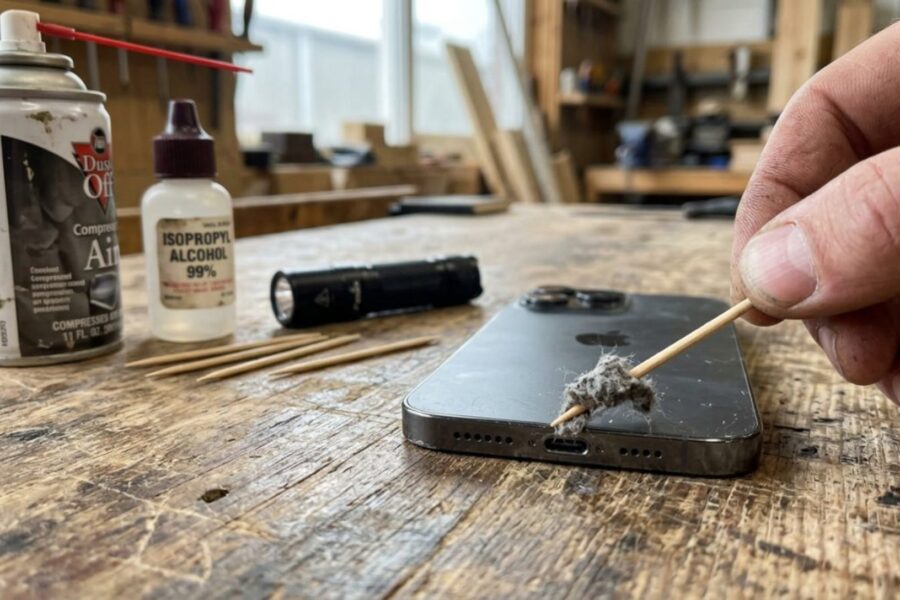
Had this one on the bench last week. Guy came in convinced his iPhone battery was shot — three years old, barely holding a charge, started dying overnight. He’d already bought two new cables and a new wall brick. None of it helped. I shone a flashlight into the Lightning port and there it was: a solid grey puck of lint, compacted so tight it looked like it had been pressed in with a stamp. Every time he’d pushed a cable in over the years, he’d been tamping that lint deeper and harder. The cable was sitting on top of the lint puck, never making full contact with the pins. Took me two minutes with a wooden toothpick and a short blast of compressed air. Phone charged to 100% overnight. He’d spent $30 on cables he didn’t need.
That’s the job today. Let’s do it right.
Tools & Parts You’ll Need
- Wooden toothpicks — flat or round, from any dollar store or Home Depot. Plastic ones work too. Never metal.
- Can of compressed air — ~$7 at Amazon, Staples, or any office supply store. Make sure it has a straw nozzle.
- 99% isopropyl alcohol — ~$5 at Walmart or your local pharmacy. Must be 99%, not 70% — lower concentrations leave water residue that can damage pins.
- Small flashlight or phone torch — you need to actually see inside the port before you start poking around.
- Anti-static brush (optional) — a small electronics brush (~$4–8) can help loosen lint before scraping. A clean, dry toothbrush works in a pinch.
- A known-good charging cable and wall adapter — borrow one if you can. You need to confirm your charger itself is not the problem before you declare victory.
- Cotton (a tiny wisp) — pull a thread-thin amount from a cotton ball. Not a full swab — too much bulk.

See Also
- Having trouble with bigger home repairs? Read our guide on why your garage door won’t open or close — and how to fix it yourself.
- If your circuit breaker keeps tripping, here’s what’s actually going on and when it’s safe to reset it.
- Also worth a look: why your dishwasher isn’t cleaning dishes properly and what you can do about it tonight.
Step-by-Step Fix
- Power the phone completely off — and inspect the battery first. This is not optional. Do not clean a charging port while the phone is on or plugged in. Before you do anything else, remove the case and look at the back of the phone. If the phone looks swollen, if the back cover is bowing outward, or if the phone gets noticeably hot while charging, stop here. Do not proceed. See the “When to Call a Pro” section below. A swollen lithium battery is a fire risk and is not a DIY repair.
- Get good light and look inside the port. Shine a flashlight directly into the charging port. You’re looking for a grey or dark-colored mass sitting at the bottom — sometimes it looks fuzzy, sometimes it’s pressed so flat it looks like part of the port itself. If you see it, you’ve found your problem. If the port looks clear, move to the troubleshooting section instead.
- Short burst of compressed air — can held upright, straw angled in. Hold the can upright (tilting it can spray propellant liquid, which you don’t want inside a phone). Give the port one or two short, sharp bursts. This may loosen the outer layer of lint enough to blow some of it out. Don’t hold the trigger down continuously.
- Gently scrape with a wooden or plastic toothpick along the sides and bottom. Insert the toothpick at the edge of the port — not the center. The center contact is what the cable connects to; you want to avoid jabbing it directly. Work along the sides and the floor of the port with light, scooping strokes. You’re trying to loosen the lint and work it toward you, not pack it deeper. Take your time. Go slow.
- Pull the lint out, don’t push it in. As you loosen pieces, use the toothpick to drag them toward the opening and out. Some will fall out on their own. Others need coaxing. If a chunk breaks off deeper in, use the compressed air again to push it toward you. Keep going until the port looks clear under the flashlight.
- Optional: clean the pins with 99% isopropyl alcohol. Tear off a thread-thin wisp of cotton and wrap it around the end of the toothpick. Dip it lightly into the alcohol so it’s just barely damp, not dripping. Run it gently across the pins at the bottom of the port to remove oxidation or grime. Then set the phone down and let it sit for at least two to three minutes. The alcohol must evaporate completely before you power the phone back on.
- Inspect the port again with the flashlight. Before you plug anything in, confirm the port is clear. If you see debris remaining, repeat the toothpick step. If the port looks clean and the pins look undamaged, you’re ready to test.
- Reseat a known-good cable and wall adapter. Plug in a cable you’re certain works. Use a proper wall adapter, not a USB port on a laptop or a car charger — those can trickle-charge too slowly to tell if it’s actually working. Plug it into a wall outlet, not a power strip, to eliminate one more variable.
- Power the phone back on and watch the charging indicator. Within thirty seconds, you should see the charging icon appear. Let it sit for five minutes and confirm the battery percentage is actually rising. If it is, you’re done.
- If it charges, great — put lint prevention on your radar. Keep your phone in a pocket without loose debris, or pick up a cheap port cover. Checking the port every few months with a flashlight is a thirty-second habit that prevents this from happening again.
Safety reminders throughout: never use a metal tool (needle, paper clip, SIM tool) in a charging port — you will scratch or bend the pins. Never clean the port while the phone is powered on or connected to power. If you used isopropyl alcohol, let it fully evaporate before powering on — alcohol and live electronics don’t mix.

What to Check If It Still Won’t Charge
You cleaned the port and it’s still not charging. Here’s what to work through systematically before assuming the port itself is broken.
Rule out the charger entirely. Swap out the cable, the wall adapter, and even the outlet. A phone charging slowly all of a sudden is often a wattage mismatch — a USB 2.0 port on a computer or a cheap 5W adapter can’t keep up with a modern phone. Use the original adapter or one rated for fast charging. A cable that’s frayed internally can also pass just enough power to show a charging icon without actually moving the battery needle.
Test wireless charging if your phone supports it. If your phone charges normally on a Qi wireless pad, the port is the problem — either it’s still dirty, the pins are damaged, or there’s a loose connection inside. If it won’t charge wirelessly either, the issue is more likely a battery or software problem.
Look for bent or corroded pins. If you dropped the phone in water or left it in a humid environment, the charging port pins may be corroded (greenish or white residue on the metal contacts). Corrosion isn’t something a toothpick fixes — it requires professional cleaning or port replacement. Bent pins look like one of the small gold contacts is pushed down or to the side instead of sitting flat.
The phone says charging but battery isn’t going up — or it’s stuck at 80%. On iPhones running iOS 13 or later, Optimized Battery Charging intentionally pauses charging at 80% overnight. The phone will say it’s charging, the lightning bolt will appear, but the percentage won’t move for hours. This is not a malfunction. You can disable it temporarily in Settings → Battery → Battery Health & Charging. Android phones have similar features under battery settings. If the phone says charging but battery not going up during the day, that’s usually a mismatched adapter or a partially failed battery reading charge incorrectly.
Phone only charges at a certain angle. If you have to prop the phone at a specific angle to get it to charge, and cleaning the port didn’t resolve it, the port’s internal connector is likely damaged — a loose solder joint where the port meets the motherboard, or a bent port housing. That’s a micro-soldering job. Don’t keep torquing the cable; you’ll make the repair more expensive.
When to Call a Pro
There’s a clear line between what you should do yourself and what you shouldn’t. Here’s where it sits.
- Swollen or bulging battery. If the back of your phone is bowed, the screen is lifting, or the phone feels thicker than it used to — stop. Do not puncture it, do not keep charging it, do not put it in your pocket. Take it to a phone repair shop or an authorized service center. Lithium battery fires are fast and serious.
- Liquid or corrosion damage. Green, white, or rust-colored residue on the pins means moisture got in. This needs ultrasonic cleaning equipment and possibly board-level repair. DIY attempts here usually make it worse.
- Bent or broken port pins. If a pin inside the port is visibly bent or missing, that’s a port replacement. On most modern phones the charging port is a separate daughter board — a $40–80 repair at a reputable shop, depending on the model.
- Charges only at a certain angle after cleaning. Loose solder joint — micro-soldering repair needed. Not a home fix.
The DIY rule is simple: if the problem is debris, clean it. If the problem is physical or electrical damage, get a pro. Don’t try to be a hero with a bent port and a needle.
Frequently Asked Questions
Why won’t my phone charge when plugged in?
The most common reason is lint or debris packed into the charging port, preventing the cable from making full contact with the pins. Work through the cleaning steps above before assuming it’s a battery or hardware failure. After that, check the cable, the adapter, and the outlet — in that order.
Is it safe to clean a charging port with a toothpick?
Yes — as long as the toothpick is wooden or plastic, the phone is powered off, and you work along the sides and bottom of the port rather than jabbing the center contact pin. A wooden toothpick is soft enough that it won’t scratch or bend the metal contacts. Never use a metal tool, and never clean the port while the phone is on or plugged in.
Why is my phone charging so slow all of a sudden?
Slow charging is usually a power delivery mismatch. If you’re charging via a USB 2.0 port on a laptop, a generic 5W cube, or a cheap third-party cable, you’re not delivering enough wattage for the phone to charge at its rated speed — especially if you’re using the phone while it charges. Also check for a partial lint blockage in the port, which can cause intermittent contact and slow charge rates even when it appears to be charging normally.
Phone won’t charge but turns on — what’s wrong?
If your phone powers on but won’t register a charge, the issue is almost always in the charging path: a dirty or obstructed port, a failed cable, or a faulty adapter. Run through the cleaning steps, then test with a known-good charger. If wireless charging works but the port doesn’t respond, the port itself is the problem — either still dirty or physically damaged.
iPhone says it’s charging but the battery isn’t going up — why?
Check if Optimized Battery Charging is active (Settings → Battery → Battery Health & Charging). This feature intentionally holds the iPhone at 80% overnight to reduce long-term battery wear. It’s not a bug. If this happens during regular daytime use, you may have a mismatched adapter supplying power too slowly, or in rarer cases a battery that’s partially failed and misreporting its charge level.
How do I get lint out of a charging port?
Power the phone off first. Use a flashlight to see inside the port. Give it one or two short bursts of compressed air (can held upright). Then use a wooden or plastic toothpick to gently scrape along the sides and bottom of the port, scooping lint toward the opening. Pull it out — don’t push it deeper. Optionally, use a wisp of cotton barely dampened with 99% isopropyl alcohol on the toothpick to clean the pins. Let it dry fully before powering back on.
Sources
- iFixit — Repair guides, teardowns, and replacement parts for phones and consumer electronics.
- Asurion: How to Clean Out Your Android or iPhone Charging Port — Step-by-step cleaning guide from a major device protection and repair company.
- Apple Support — Official guidance on iPhone battery health, charging behavior, and Optimized Battery Charging.
Our Point of View
The repair and accessories industry makes a quiet fortune off people replacing cables and batteries that don’t need replacing. A lint-clogged charging port accounts for a significant slice of “my phone won’t charge” complaints — and the fix is a wooden toothpick and five minutes. You don’t need a new cable. You don’t need a battery replacement. You don’t need to pay a tech. The reason this keeps happening is that nobody tells you to check the port first, because there’s no money in telling you that. We’d rather you know.
This article was reviewed by our editorial desk for accuracy. John Fix is verified at LinkedIn. Sources are linked inline and listed below. We update articles when new information becomes available. Last reviewed: June 21, 2026.
Related Reading
- Is your refrigerator not cooling? Here’s how to diagnose it before calling a technician.
- Sweating through summer? Find out why your car AC isn’t blowing cold air — and what you can do about it.
- Also related: when your fridge runs but won’t cool, the culprit is often simpler than you think.
Disclaimer: The information in this article is provided for general educational purposes. Always prioritize your safety. If you are unsure about any repair, consult a qualified professional. FixItWhy Media is not responsible for any damage resulting from DIY repair attempts. — FixItWhy Media